
Wall vinyl stickers
Wall Vinyl Stickers instructions:
The vinyl sticker is inserted between a layer of silicone white backing paper and a semi translucent transfer foil.

TIPS BEFORE YOU START
- Before you start, clean very well the area where you’ll be applying the sticker. Make sure it is free from dirt, grease and allow to dry.
- Wait at least 3-4 weeks before applying your sticker to a freshly painted wall.
- Please note that whilst your sticker is removable, it is not reusable. This means you’ll need to take care when fitting the sticker.
- Be careful when moving the sticker. The adhesive is very sticky, so the backing can easily stick to itself.
- If applying on glass / window / mirror please spray with water the entire surface to remove all possible air bubbles.
- Just take your time with it, this will achieve the best results.
Step 1 CLEAN
Clean very well the surface from dust, dirt, grease and allow to dry.
Important: If the surface is not well cleaned the sticker might not stick so well.
Step 2 FLAT
Unroll the sticker and push with a credit card along the sticker, to make sure the transfer foil sticks to vinyl sticker underneath very well. That will help you apply the sticker without any problems.


Step 3 POSITION
Position your sticker where you want it to go with the masking tape and mark all corners with a pencil on the wall.

When you buy a bigger format you might receive 2, 3 or 4 piece sticker.
You can also cut your sticker into smaller separate sections for an easier apply.
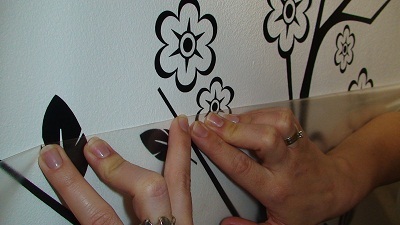
Remove and separate slowly the transparent part with the vinyl sticker from the background.


If any element doesn't want to separate - rub harder with your finger .


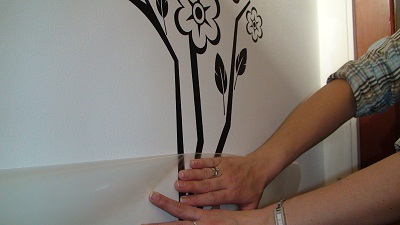
Step 4 APPLY
Apply to the surface (the best with another person's help) from the top to bottom or side to side. Don't stick the whole sticker at once. Rub the applied piece of sticker with a soft cloth or credit card from side to side to remove air bubbles.


Step 5 REMOVE
Rub all over the sticker to make sure the adhesive has made contact with the surface and leave for half an hour to make a good bond. Then peel off the transfer foil delicately.
Start from one of the corners and follow slowly. If any pieces of the sticker would start to come off (wouldn't stick properly to the surface) please bring back the transfer foil and rub again with a credit card to apply properly.
You are done, congratulations.
Your Spongie.
- RESOLVING PROBLEMS.
*Air bubbles - If you have any air bubbles, don't panic. The solution is to pop the air bubble delicately with a pin (on the edge of the bubble is best, not the center). Now carefully smooth the vinyl down towards the hole. The air should escape through the hole and the vinyl should flatten nicely. You'll barely notice the hole once it's done.
*Piece doesn't stick to the surface - If it's a small piece of vinyl that's coming away from the surface it means that it just hasn't been rubbed against the surface properly and didn't form a bond. Use a hairdryer or heat gun to very gently heat the vinyl - this will reactivate the adhesive. Then carefully smooth the vinyl back down onto the surface. Rub over the top then leave the adhesive to form a bond.
*Wrinkles and creases - usually caused in the application process by not smoothing the vinyl down properly. The solution is to gently heat the creased vinyl and then carefully smooth it down with a squeegee tool / credit card. Be careful not to go overboard with the hairdryer!
*Sticker came off with the paint - In most cases this is caused by trying to apply the vinyl to a recently decorated wall. The solvent fumes given off by drying paint attack the adhesive on the vinyl and prevent it from forming a bond with the wall. Check the back of the vinyl where its come away from the wall and if it's no longer sticky then this is the case. It's possible but tricky to fix, the solution is to wait until the paint has completely dried. Then using a small amount of wallpaper paste apply this to the back of the sticker and then carefully smooth it down onto the wall. In some cases the sticker will still be sticky on the back - this is usually the case if it has been applied to a non-stick paint (paint that contains teflon or similar). The answer is to use a fixing medium between the paint and the sticker to allow the sticker to form a bond. There are several things that can be used, clear coat spray paint or pva glue, both work well. Once the wall is coated and dried the sticker can be applied properly.
